Fitting and templates
Scribe a template to an uneven edge
Use a cardboard trial to understand a fixed offset before shaping a wooden part.
Materials and practice dimensions
- A cardboard blank about 300 × 100 mm and a second scrap with a gentle uneven edge
- Pencil compass or transfer scribe that can maintain a 10 mm offset; ruler; tape
- Scissors for the cardboard trial; a flat work surface
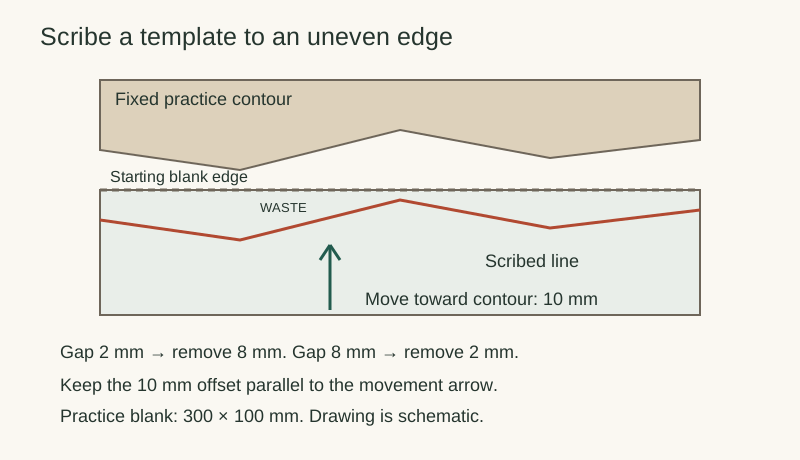
Use a loose practice contour on the bench. Avoid tight corners and undercuts. Place the blank alongside it with their faces in the same plane. In this example the gap varies from 2 to 8 mm. A 10 mm offset puts the entire pencil line inside the blank. Preserve room to move the trimmed template 10 mm toward the contour.
Work through the procedure
1. Fix the starting position
Tape the contour in place and mark two alignment ticks on the bench for the blank. Keep the blank still while tracing. Draw an arrow showing the single direction in which it will later move toward the contour.
2. Set and check the offset
Set 10 mm between the tracing contact and pencil point. Make a short trial on spare card. With a compass, keep the line between its points parallel to the movement arrow; turning it to follow the local slope changes the copied shape.
3. Trace without changing orientation
Move the contact along the contour while keeping the pencil on the blank and the offset direction constant. Work slowly around broad changes in shape. Stop if the contact loses the edge or the tool cannot reach a recess.
4. Remove the marked waste
Label the strip between the original blank edge and the pencil line WASTE. Cut this cardboard strip away with scissors. Keep the intended retained side of the line. Do not cut a wood workpiece from an incomplete trace.
5. Move and check
Translate the template 10 mm toward the contour without rotating it. Check contact along the full edge and confirm the alignment direction. Mark any local mismatch on the template. Once the cardboard trial fits, use it to plan the wooden part and its remaining width.
Worked example
At a 2 mm starting gap, the scribed line lies 8 mm into the blank: 10 minus 2. At an 8 mm gap, it lies 2 mm in. Removing those different amounts and moving the whole template 10 mm closes the example gap. The opposite edge also moves 10 mm, so verify its final location before committing a part that must fit between two fixed sides.
Check the result
- Offset exceeds the largest starting gap and the full trace lies inside the blank.
- Tool orientation remains parallel to the chosen movement direction.
- The trimmed template fits after translation without being rotated or forced.
If it does not work
A short recess that the tool bridges is not captured. Use a more suitable tracing method or several fitted template pieces for that feature. If the whole profile is wrong, check movement direction and offset before trimming again. Preserve the original blank outline on the worksheet so lost material remains visible.
Keep a workshop record
Use the downloadable worksheet or print this page and write beside each prompt.
Minimum / maximum starting gap: ____________________
Chosen offset: ____________________
Direction of movement: ____________________
Template fit after translation: ____________________
Remaining width at narrowest point: ____________________
Uncaptured corners or recesses: ____________________
Continue your work
Sources and method
The practice dimensions, examples and diagrams are original. Manufacturer guidance is scoped to the named products. Review the current product instructions before using them. Sources checked October 20, 2026.
- Lee Valley: Simple Scribe — Description: fixed registration faces and offsets.