Marking and layout
Check a square with a flip test
Find a repeatable disagreement before using a square to lay out small parts.
Materials and practice dimensions
- One flat practice board, about 300 × 200 mm, with a checked straight reference edge
- Combination square with at least 150 mm of exposed blade; sharp pencil; straightedge
- Paper worksheet and a ruler for recording the comparison
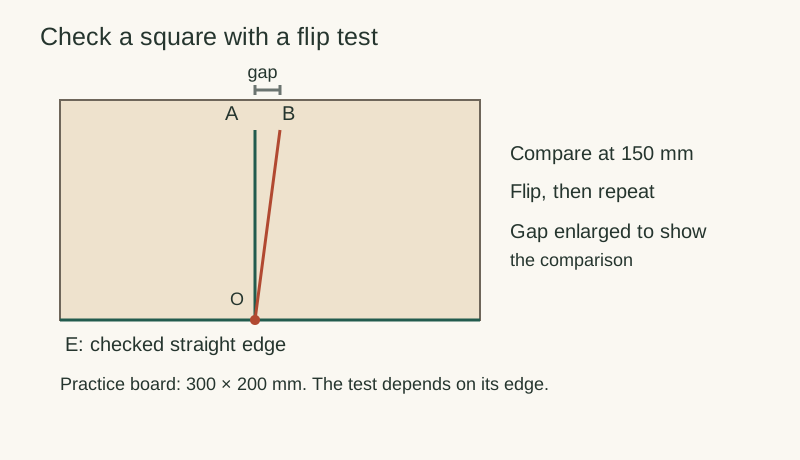
Use a clean, undamaged edge and remove debris from the square head. The 300 × 200 mm board is a convenient practice size, not a calibration standard. Choose a 150 mm comparison distance that fits the blade. Secure the board so it cannot slide while marking.
Work through the procedure
1. Establish the reference
Mark the long reference edge E and a starting point O near its middle. Check the edge against a reliable straightedge. If light or rocking shows an uneven area, choose another board; a rough edge can imitate a faulty square.
2. Draw the first line
Seat the head against E and draw a fine line from O for 150 mm. Keep the head seated without twisting it. Name this line A. Do not move the pencil point sideways while bringing the blade to it.
3. Reverse the square
Lift and flip the square so the head bears on the other side of O along the same edge. Bring the same blade edge back to O and mark line B. Keep the same face of the board upward.
4. Compare and repeat
Compare A and B at O, halfway along, and at 150 mm. Repeat at a second place on the checked edge. Record overlap, separation and whether the direction repeats. A thick pencil line may hide a small disagreement.
Worked example
For an ideal straight reference and two lines starting at the same point, a 1 mm separation 150 mm away corresponds to about 0.5 mm of single-line sideways error at that distance. This is an illustrative geometry result, not an acceptable tolerance. If the separation changes when the test moves along the board, inspect the reference edge and seating before blaming the square.
Check the result
- Both lines start at the same point and use the same reference edge.
- The repeated test agrees within the visible line width. Record that width as a limit of this check.
- A persistent disagreement is resolved with a known-good reference or manufacturer service before critical layout.
If it does not work
Clean and reseat the head, tighten its lock as directed by the maker, and try another checked edge. Do not file the tool based on one pencil test. A successful comparison does not certify the blade, head or graduations to a metrology standard.
Keep a workshop record
Use the downloadable worksheet or print this page and write beside each prompt.
Reference edge and board: ____________________
Comparison distance (mm): ____________________
Separation at first position (mm): ____________________
Separation at second position (mm): ____________________
Pencil line width / uncertainty: ____________________
Decision: usable for this layout / investigate: ____________________
Continue your work
Sources and method
The practice dimensions, examples and diagrams are original. Manufacturer guidance is scoped to the named products. Review the current product instructions before using them. Sources checked October 20, 2026.
- Starrett: Combination Square FAQ — In the field inspection.